Wednesday, December 28, 2011

Braised Beef with Porcini Mushrooms

A few years ago our family spent Christmas in Sarasota, Florida. We wanted to make something festive to celebrate the holiday so my mom made the below Braised Beef recipe. It was super easy, just required a some time in the oven, and turned out fantastic. This year we decided to make the recipe again for our family Christmas in Kansas City and it was as good as I remember.

I think this is a perfect recipe for the holidays, entertaining during the winter months, or even just a Sunday family dinner. It's hearty and warming and makes the kitchen smell great plus it will please even the pickiest of eaters (maybe just don't mention there are mushrooms in the sauce). Depending on the crowd you are feeding, you are also likely to end up with leftovers that can be made into a simple beef and vegetable soup. Can't beat a great meal plus the possibility of leftovers!

I planned to take a second picture once we put everything on the serving platter but forgot. 
Braised Beef with Porcini Mushrooms
** adapted from Food Network, recipe courtesy of Giada De Laurentiis

Serves 6
Prep/Cook Time: 3 1/2 hours

1 (4 pound) boneless beef chuck roast
salt and pepper
3 T. olive oil
1 large onion, sliced
6 garlic cloves, coarsely chopped
1 cup dry red wine
1 3/4 cup beef broth
1 ounce dried porcini mushrooms
1 large sprig fresh rosemary, plus extra for garnish
1 bag whole carrots, peeled and cut into chunks
10 small yukon gold potatoes, cut in half

Preheat oven to 350.

Dry the beef with a paper towel and then season generously with salt and pepper. Heat 2 tablespoons olive oil in a heavy dutch oven over medium-high heat. Add the beef and cook until brown on all sides, about 15 minutes total. Transfer the beef to a plate. Add remaining tablespoon oil to the pan, add the onion and saute until tender, about 5 minutes. Add the garlic and saute 1 minute. Add the wine, broth, and mushrooms and boil for about a minute. Return the beef to the pan, bring the liquids to a boil and then cover and transfer the oven. Braise for 1 1/2 hours and then add the carrots and potatoes to the pan and braise for another 1 1/2.

Remove the pan from the oven and transfer the meat to a cutting board. Tent the beef with foil and let stand 15 minutes. Meanwhile, skim off any fat from the pan juices and set aside the potatoes and carrots. Add the rosemary to the dutch oven and heat the sauce over medium-high heat. Bring to a boil and then season with salt and pepper to taste. (If you prefer a thicker gravy you could add a little cornstarch while the sauce is being heated).

Cut the beef across the grain into 1/2 inch thick slices. Arrange the sliced beef on the patter and garnish with rosemary. Arrange the potatoes and carrots around the beef and spoon the sauce over when serving.

Monday, December 26, 2011

Pecan Topped Pumpkin Bread

Pumpkin bread is one of my favorite things to make over the holidays. I started using the below recipe about 4 years ago and haven't bothered to look for a new one. This recipe is so simple and it tastes great. Back in my roommate days, my friend Lesley and I would make loaves and loaves for coworkers, bosses and friends. Now I just double the below recipe so I can have a few loaves to give as gifts and then a leftover loaf for myself. The bread freezes great, just cover tightly with plastic wrap and then a sheet of aluminum foil. Chances are good though that the bread will never end up making it to your freezer!
No, my photography skills did not dramatically improve over the holidays. The picture is courtesy of Cooking Light.
Pecan Topped Pumpkin Bread
** from Cooking Light

Makes two 9x5 loaves
Prep/Cook Time: 1 hour and 10 minutes

3 1/3 cup all purpose flour
1 T. baking powder
2 tsp baking soda
1 tsp salt
1 tsp ground cinnamon
1 tsp ground nutmeg
1/2 tsp ground allspice
2 cup granulated sugar
1/2 cup egg substitute
1/2 cup fat free plain yogurt
2 large eggs
2/3 cup water
1 (15 ounce) can pumpkin
1/3 cup chopped pecans

Preheat oven to 350°.

Combine flour and next 6 ingredients (through allspice) in a large mixing bowl.

Place sugar, egg substitute, oil, buttermilk, and eggs in a large bowl; beat with a mixer at high speed until well blended. Add 2/3 cup water and pumpkin, beating at low speed until blended. Add flour mixture to pumpkin mixture, beating at low speed just until combined. Spoon batter into 2 (9 x 5-inch) loaf pans coated with cooking spray. Sprinkle pecans evenly over batter. Bake at 350° for 1 hour or until a wooden pick inserted in center comes out clean. Cool 10 minutes in pans on a wire rack; remove from pans. Cool completely on wire rack.
** Check the bread after 45 minutes of baking--you may need to cover the loaves with aluminum foil for the last 15 minutes to prevent overbrowning.

Wednesday, December 14, 2011

Roasted Cauliflower with Fresh Herbs and Parmesan

Brady made the below roasted cauliflower recipe at Thanksgiving and we made it again the other day. I've made other roasted cauliflower recipes before but this is by far the best I've had. The herbs and touch of Parmesan give the dish such great flavor plus I like the addition of the lemon juice. This recipe could easily be made with whatever herbs you have on hand or find on sale; we used different herbs then those in the original recipe and I think the dish turned out great!

Roasted Cauliflower with Fresh Herbs and Parmesan
** from Cooking Light

Serves 4
Prep/Cook Time: 30 minutes

6 cups cauliflower florets (about 1 head)
1 T. olive oil
1 T. chopped fresh rosemary
1 T. chopped fresh sage
1 T. chopped fresh chives
2 garlic cloves, minced
1/4 c. graded fresh Parmesan cheese
2 T. fresh lemon juice
1/2 teaspoon salt
1/4 teaspoon pepper

Preheat oven to 450.

Place cauliflower in a large roasting pan. Drizzle with oil; toss well to coat. Bake for 20 minutes or until tender and browned, stirring after 10 minutes. Remove from the oven and sprinkle with half the rosemary, half the sage and half the chives. Also sprinkle with the minced garlic. Bake for an additional 5 minutes. In a serving bowl, combine the cauliflower mixture, Parmesan cheese, lemon juice, and remaining herbs. Season with salt and pepper.

Bourbon Glazed Pork Chops

I think the below recipe might be Paula Deen's one and only healthy recipe. Anyone who has ever made a Paula recipe (or just watched her cooking show) knows that she loves butter, cream, oil and more butter. Brady made these bourbon glazed pork chops this week and not only were they shockingly healthy but they were super easy and tasted great. I believe that Brady even deemed this his new favorite pork chop recipe. We served the pork chops with a great roasted cauliflower side dish which has definitely taken the title of my new favorite cauliflower recipe :)


Bourbon Glazed Pork Chops
** from Food Network, recipe by Paula Deen

Serves 2
Prep/Cook Time: 30 minutes

2 T. Dijon mustard
1 tsp. packed dark brown sugar
1 T. bourbon
2 center cut boneless pork chops
1 clove garlic, minced
salt
pepper
garlic powder

Preheat oven to 450.

In a small bowl, combine a little bit of salt, pepper and garlic powder. Set aside.

In another small bowl, combine the mustard, brown sugar, and bourbon. Rub the pork chops with the minced garlic, the salt/pepper/garlic seasoning, and half of the glaze.

Heat a large grill pan over medium high heat. Coat with cooking spray. Place the chops on the grill. Grill about 4 minutes on each side and then move the pan to the oven to finish cooking the chops for an additional 5-7 minutes (or until no longer pink). Top the pork chops with the remaining glaze before serving.

Sunday, December 11, 2011

Sausage, Kale and White Bean Soup

I made the below Cooking Light recipe for Sausage, Kale and White Bean Soup this afternoon. I thought this soup sounded perfect for lunches this week. I loved that the soup had minimal ingredients. This turned out to be an even bigger plus because I went to Trader Joes after doing my Christmas shopping (ie. no free hands for carrying groceries). The original recipe didn't have the garlic or the herbs but I thought the flavor was a little bland so I added them and the additions made a big difference. If the holiday sweets, treats and feasts are starting to make you feel a little blah, this tasty and healthy soup is perfect for getting you back on track (or least giving you a little break before the Christmas and New Year's grazing begins!)

 Sausage, Kale and White Bean Soup
** adapted from Cooking Light

Prep/Cook Time: 20 minutes
Serves 6


2 Spicy Italian chicken sausage links, chopped
6 cups fat-free, less-sodium chicken broth 
2 (14.5-ounce) can no-salt-added diced tomatoes, undrained 
1 bag coarsely chopped kale (about 8 ounces)
2 (16-ounce) can white beans, drained and rinsed
2 garlic cloves, minced
1 tsp dried oregano
1 tsp dried basil
Grated Parmesan cheese


In a small skillet coated with PAM, saute the chicken sausage for about 4 minutes. Add the minced garlic and saute another minute.


Meanwhile, in a large soup pot, heat the chicken broth and undrained tomatoes over high heat. Once boiling add the white beans and chicken sausage. Stir in the chopped kale, oregano and dried basil and cook about 2 minutes or until the kale has wilted. Ladle into soup bowls and garnish with a little grated Parmesan cheese.

Thursday, December 1, 2011

Mushroom Ragu

Last winter I made a mushroom bolognese, it was good but the below recipe for mushroom ragu is even better. Brady made the mushroom ragu for us before Thanksgiving and we both absolutely loved it. I love that this is a hearty and filling dish yet it's meat free. This is a recipe that could easily be lightened and requires little ingredients. We served our ragu over whole wheat gnocchi but it would be terrific over any type of pasta.
Sorry, not the best photo but I promise it tastes good!
Mushroom Ragu
** from Food Network, recipe by Giada De Laurentiis

Serves 4
Prep/Cook Time: 45 minutes

1/4 c. extra virgin olive oil (this could be decreased)
1 large onion, chopped
2 garlic cloves, minced
1 pound mixed mushrooms, chopped
1/2 c. Marsala
2 c. chicken broth
1/3 c. heavy cream (you could substitute half and half)
5 fresh basil leaves, chopped
1/4 c. flat parsley, chopped
1/2 c. Parmesan cheese, grated

In a large skillet heat the oil. Add the onions and garlic over medium-low heat until the onions have softened, about 8 minutes. Add the mushrooms and season with salt and pepper. Raise heat to high and saute until mushrooms are tender and all the liquid has evaporated. Remove pan from heat and pour in Marsala. Return pan to stove and allow wine to evaporate, about 3 minutes.

Add chicken broth and simmer for about 30 minutes or until the sauce has reduced by half. Add the cream and mix well. Take the pan off the heat add the fresh herbs and Parmesan cheese and mix thoroughly. Serve over your favorite pasta.

Wednesday, November 30, 2011

Bourbon Pecan Tart

Thanksgiving has always been my favorite holiday. I love spending time with my family, eating great food and of course Black Friday shopping! After a short school week last week I headed to St. Louis where I spent my Thanksgiving break with my family. Thursday was a day full of cooking, eating, and eating some more. Instead of a classic pecan pie we used the below bourbon pecan tart recipe from Cooking Light. I have made this recipe numerous times and it never disappoints. This is super easy recipe that is perfect for any holiday (or regular day) dessert.


Bourbon Pecan Tart
** from Cooking Light

1 c. light brown sugar
3/4 c. dark corn syrup
3 T. flour
2 T. bourbon
2 T. molasses
1 T. butter, melted
1/2 tsp vanilla extract
1/4 tsp salt
2 large eggs
1 large egg white
2/3 cup pecan halves (you may want to add extra)
refridgerated pie crust
1/2 ounce bittersweet chocolate chips

Preheat oven to 350°.

Combine first 10 ingredients, stirring well with a whisk. Stir in pecans. Roll dough into a 13-inch circle; fit into a 9-inch removable-bottom tart pan coated with cooking spray. Trim excess crust using a sharp knife. Spoon pecan mixture into prepared crust. Bake at 350° for 45 minutes or until center is set. Cool completely on a wire rack.

Place chocolate in a Ziplock bag; microwave on HIGH 1 minute or until melted. Stir until smooth and cut the edge of the bag. Drizzle chocolate over tart.

Saturday, November 12, 2011

Perennial Virant

Last night Brady and I celebrated my birthday at Perennial Virant in Lincoln Park. We had an amazing meal; for about an hour and half I even forgot that I am no longer in my 20's! I loved everything that we ordered. The menu is designed for sharing with small, medium and large plates which I am a big fan of. We ordered 2 small plates, 1 medium and then we each got a large. It sounds like a lot of food but it was the perfect amount for the two of us, we both left satisfied but not stuffed. I still had plenty of room for the birthday cupcakes my friend Thru brought out to the bar later!

For our small plates, we ordered the Crispy Carnaroli Rice which was fried cheese curds served with a sweet onion vinaigrette and pea shoots. Think a more sophisticated version of mozzarella sticks! Our other small plate was the special for the day, Nantucket scallops caramelized in a sorghum butter and served over wilted spinach and candied walnuts.

If I was forced to choose a favorite, I would say our medium plate was the best. We ordered barramundi served over a sweet potato puree and brussel sprouts with a bacon and cranberry vinaigrette. I love brussel sprouts and the combination of the cranberry and bacon made them beyond good. This dish was so good that Brady has now been converted to a brussel sprout fan!

For our large plates, I had grilled pork with wheatberries, broccoli and mushrooms and Brady ordered the sturgeon. I really liked my dish but Brady's definitely got extra point for being interesting. His sturgeon was served with braised beef and was a unique play on surf and turf. I was very impressed with all of the flavor combinations in the food that we had and I loved how the chef incorporates local seasonal ingredients from area farms. This is definitely a restaurant we will be going back to. I am thinking that this would be a great place to bring my parents when they come visit before the holidays!

Sorry, no pictures of the food. You'll just have to trust me that it was all blog worthy! But here is a cute picture from the bar where we continued the birthday festivities :)

Tuesday, November 8, 2011

Pasta with Corn, Burrata, Pancetta, and Chilies

I love it when you can make a great dinner on the cheap and quickly. There are days (usually Sunday's) when I like to make something that's a little more time consuming, but sometimes it's really nice to be able to make a great dinner in under 20 minutes. Last Friday night, Brady and I made the below pasta recipe and it was perfect- cheap, fast and tasted great!

Picture taken from Une-deux Senses- mine didn't turn out well.
Pasta with Corn, Burrata, Pancetta, and Chilies
** adapted from Une-duex Senses

Serves 2-4 (depending on how much you eat!)
Prep/Cook Time: 20 minutes

1/2 pound dried or fresh pappardelle or fettuccine ***
1/2 c. panko bread crumbs
1/2 c. fresh basil leaves, plus extra to garnish
olive oil
1/4 pound pancetta, diced
1/2 can corn (or if it's in season, 2 ears of fresh corn)
4 dried red chilies, seeds removed and cut into small pieces
1/2 c. Parmesan, shredded
1/4 pound burrata

Cook the pasta according to directions. Drain, reserving 1 cup of the pasta water.

While the pasta is cooking, place the bread crumbs, basil, and a little salt in a food processor; grind until smooth. Drizzle the bread crumbs with 1 Tablespoon olive oil and process until incorporated. Using a non-stick skillet, toast the bread crumb mixture until lightly browned and dry, set aside.

For the sauce, heat 1 Tablespoon of olive oil in a large skillet. Add the pancetta and cook for 2 minutes or until slightly browned. Add the corn and chilies and cook on medium for 5-7 minutes, stirring occasionally. Add the cooked pasta, Parmesan, and 1/2 cup of pasta water. If needed add the extra pasta water. To serve, garnish the pasta with a sprinkling of the toasted bread crumbs, a couple of chunks of burrata, and torn basil leaves.

*** I would highly recommend the Trader Joe's brand of lemon pepper pappardelle, it added so much extra flavor to the dish.

Sunday, November 6, 2011

Lamb Tagine with Chickpeas and Apricots

I recently came across the below recipe for lamb tagine while flipping through Bon Appetit magazine at the airport. The recipe reminded me of a great halibut tagine dish that I had at a cooking class in Sonoma and I knew I had to give the recipe a try. It was beyond good. Brady and I absolutely loved this recipe. I know lamb sounds a little intimidating and expensive but this dish was so cheap and easy to make. I made the whole dish for under $20 and while it may cook for awhile (almost 2 hours), all you have to do is brown the meat and throw everything in the pot to cook and 2 hours later you have a restaurant quality dish.

One thing to point out, Ras-el-Hanout might be a challenge to find. I looked at Whole Foods where I bought the lamb and they didn't have it. I ended up having to go to a spice shop to buy the Moroccan spice blend. It can be made at home if you have a spice mill but if you have a spice shop around you I think that's the best way to go. I got a small baggie for about $2 plus it was fun to check out all of the spices available.

Lamb Tagine with Chickpeas and Apricots
** adapted from Bon Appetit

Serves 4
Prep/Cook Time: 2 hours

1 can chickpeas
4 garlic cloves (2 whole, 2 chopped)
2 T. olive oil
1.5 pounds lamb shoulder, cut into 1 inch cubes
1/2 large onion, diced
3 tsp Ras-el-Hanout spice blend
1 tsp cinnamon
2 tsp chopped peeled ginger
1 cup canned diced tomatoes with juices
2 cups (or more) low-salt chicken stock
1/4 cup halved dried apricots
steamed couscous
chopped fresh cilantro

Heat oil in a large heavy pot or dutch oven over medium-high heat. Season the lamb with salt and pepper. Working in a couple batches, brown lamb on all sides, about 4 minutes per batch. Transfer lamb to a bowl and set aside. Add the chopped onion to the pot; reduce heat to medium, season with salt and pepper, and saute until soft and starting to brown, about 5 minutes. Add chopped garlic, Ras-el-Hanout, cinnamon and ginger. Stir for 1 minute. Add tomatoes and lamb and any juices from the lamb. Bring to boil. Add the stock and return to a boil, reduce heat to low, partially cover, and simmer until lamb is tender, about 1 hour 30 minutes. Make sure to stir occasionally.

Stir in chickpeas and apricots; simmer until heated through, about 10 minutes. Season with salt and pepper.

Spoon couscous into bowls and spoon lamb over top. Sprinkle with chopped cilantro.

Monday, October 31, 2011

Mediterranean Torta

Brady and I spent a weekend at my parents house in Kansas City last month. While we were there my mom made us a Mediterranean Torta appetizer. I couldn't stop eating it, it was so good!  Not only did the torta taste great but it looked really pretty. I will definitely be making this the next time I need to bring an appetizer somewhere. It's a the perfect appetizer recipe because it can be made ahead of time and is fine sitting out while people snack. I can't say anything about how it was to make but it sounds simple enough!

Mediterranean Torta
** My moms recipe, I'm not sure where she found it.

Serves 6-8

1 5 1/2 oz. package goat cheese, room temperature
4 ounces cream cheese, room temperature
1 c. toasted hazelnuts, coarsely chopped
1 c. oil-packed sun dried tomatoes
1 bunch fresh basil leaves, washed and dried

In a small bowl, mix together the goat cheese and cream cheese until well blended. Fold in the chopped hazelnuts. Set aside.

Blot the sun-dried tomatoes dry and then mince. Set aside.

For the mold, line a 2 cup round dish with plastic wrap, extending it out over the edges by about 2 inches. Cover the bottom of dish with 1/4 of the sun dried tomatoes. Top with 1/4 of the cheese mixture, packing down and smoothing it with the back of a spoon. Cover cheese with a layer of basil.

Continue layering the ingredients, making sure to pack down the cheese mixture. Pull the edges of the plastic wrap up to seal and refrigerate for at least 2 hours. To serve, open plastic wrap and turn mold out onto a serving dish. Serve with crackers or toasted bread slices.

Sunday, October 23, 2011

Butternut Squash and Cranberry Pasta

Brady made the below pasta recipe for me last week and it was definitely blog worthy. Not only did it taste good, but it looks pretty and is perfect for fall.  I loved that this was a vegetarian pasta yet it still felt hearty.We both thought that it was great as is but you could add a bit of chopped pancetta for a some texture and to add a little saltiness if you feel the need to have meat. I would imagine a little pancetta added to this dish would be pretty amazing!


Butternut Squash and Cranberry Pasta
** from Budget Bytes

Serves 4
Prep/Cook Time: 40 minutes total

1 (2 pound) butternut squash, peeled, seeded and cut into small cubes
4 T. oil, divided
1 tsp dried sage
1 pound pasta, such as orecchiette
1/2 bunch fresh parsley, chopped
1/3 c. dried cranberries
3/4 c. shredded parmesan
salt and pepper to taste

Cut the ends off of the squash to provide a flat surface. Stand the squash on one end and use a vegetable peeler to remove the skin. Slice a few rounds off of the small end to shorten the squash, and then cut down through the center of the thick end to expose the center. Use a spoon to scoop out the seeds and pulp. Cut the remaining squash into small cubes.

Heat 2 Tbsp of olive oil in a large pot or skillet over medium heat. Once the oil is hot, add the cubed squash, sage, salt & pepper (a generous sprinkle). Saute until the squash tender (about 10-15 min). Taste a cube or two to make sure they're cooked through. Turn the heat off.

While the squash is cooking, cook the pasta according to the package directions (boil for 7-10 minutes or until al dente). Drain the pasta. Once the squash is tender and the pasta is drained, add the pasta, cranberries, and chopped parsley to the pot. Stir to combine. Drizzle the last 2 Tbsp of olive oil over everything and add salt and pepper to taste. Before serving, stir in the shredded parmesan.

** You could also roast the butternut squash for about 30 minutes in a 425 degree oven. The squash got a little mushy and I think roasting it might preserve the shape and texture of the butternut squash.

Tuesday, October 18, 2011

Chicken and White Bean Soup

As I have mentioned on numerous occasions, I am a huge soup fan. I love making homemade soup and even better, I love having soup made for me! Brady made the below soup recipe last night and it was so good. The soup had such great flavor and is perfect for this time of year. I loved the addition of the crumbled bacon, there isn't a lot of bacon so it's still a healthy recipe, but it really goes well with the white beans and added a little extra flavor.

And in case you are wondering, my boyfriend doesn't normally read blogs with names like A Dainty Chef :)

Chicken and White Bean Soup
** from A Dainty Chef 

Serves 4
Prep/Cook Time: 40 minutes

3 bacon slices, cooked and chopped
12 ounces skinless, boneless chicken thighs, trimmed and cut into 2-inch pieces
1/2 cup chopped onion
1 garlic clove, minced
1 cup chopped plum tomato
2 tablespoons chopped fresh oregano
1/4 teaspoon black pepper
2 cups water
3 cups fat-free, lower-sodium chicken broth
2/3 cup uncooked orzo
1 (15-ounce) can white beans, rinsed and drained
2 tablespoons chopped fresh flat-leaf parsley
1 tablespoon white wine vinegar
1/4 teaspoon salt


Chop the onion, garlic, tomato, and oregano and set aside.. In a large saucepan over medium heat cook bacon for about 7 minutes or until crisp. Remove bacon from pan and set aside. Heat a clean saute plan over medium high heat. Add a little olive oil and the cut up chicken; sauté for about 6 minutes. Remove chicken from pan.

Add onion and garlic to a soup pot; cook 4 minutes or until tender. Add tomato, oregano, and pepper; cook for 1 minute, stirring constantly. Return bacon and chicken to pan. Stir in 2 cups water and chicken broth. Bring the water and the broth to a boil. Add orzo, and cook for 9 minutes or until al dente. Add the beans to the mixture, cook 2 minutes or until heated. Remove from heat. Finally stir in parsley, vinegar, and salt.

Thursday, October 13, 2011

Thai-Style Halibut with Coconut Curry Broth

I have been wanting to make the below Thai-Style Halibut recipe for awhile. My mom recommended it a couple years ago and I now see why. It was excellent! This was a quick recipe to make on a weeknight and the flavors and presentation are restaurant quality. The only downside is that halibut is a little pricy but it was well worth the splurge in my opinion. Brady and I couldn't stop saying how good it was, I think that's a sign of a winner :)


Thai-Style Halibut with Coconut Curry Broth
** from Food Network

Serves 2
Prep/Time: 25 minutes

1 tsp olive oil
2 shallots, finely chopped
2 1/2 tsp red curry paste
2 c. low sodium chicken broth
1/2 c. light coconut milk
salt and pepper to taste
2 (6 ounce) pieces of halibut, skin removed
4 big handfuls spinach
1/2 c. coarsely chopped fresh cilantro leaves
2 scallions, green part only, thinly sliced
1 lime
2 c. cooked brown rice, for serving

In a large saute pan, heat the oil over medium heat. Cook the shallots, stirring occasionally, until starting to brown, about 3-5 minutes. Add the curry paste and stir for about 30 seconds. Add the broth and coconut milk; simmer until reduced to 2 cups, about 5 minutes

Season the halibut with a little salt and pepper. Arrange the fish in the pan with the sauce. Cover and cook the fish until it flakes easily, about 7 minutes.

While fish is cooking, steam spinach in the microwave or on the stove using a steamer basket. Steam the spinach for about 4 minutes or until starting to wilt.

Arrange a spoonful of brown rice in the bottom of 2 soup plates. Top with a pile of steamed spinach and top with a fish fillet. Stir the cilantro, scallions, and juice of one lime into the sauce and season to taste with salt and pepper. Ladle the sauce over the fish.

Tuesday, October 11, 2011

Quinoa Salad with Pears, Spinach, and Chickpeas in a Maple Vinaigrette

Hopefully the quinoa salad recipes aren't getting old because I keep finding new recipes that I love. I made the below recipe for my lunch this week and it's so good! I love that it can be served cold which makes for a super easy lunch on the go. This recipe couldn't be easier and it's perfect for fall. If this doesn't sound hearty enough for a main dish to you, I think this would be a great side dish paired with salmon or chicken marinated in a little Dijon mustard and maple syrup.


Also, happy belated Columbus Day! I just had to share the cupcakes that I made for my class. I think they turned out pretty cute. Super easy- boxed cupcake mix and store bought frosting. I used Kellogg's Fudge Stripe cookies for the boats and used an edible candy marker to write on the candy corn. The kids loved them!
Quinoa Salad with Pears, Spinach, and Chickpeas in a Maple Vinaigrette
** adapted from Gluten Free Goddess

Serves 4 main course servings, 6 side dish servings
Prep Time: 30 minutes

1 c. quinoa
2 c. water
2 handfuls baby spinach
1 large ripe pear, washed, cored and cut into pieces
1 can chickpeas, rinsed and drained
2 T. chopped fresh parsley
salt and pepper
a handful of walnuts

Maple Vinaigrette Dressing:
3 T. extra virgin olive oil
2 T. balsamic vinegar
2 T. pure maple syrup

In a small saucepan, cook the quinoa in the 2 cups of water. Cover and cook on a low simmer until all of the water is evaporated and the quinoa is tender- roughly 20 minutes. Fluff with a work and put into a large mixing bowl.

Meanwhile, whisk the vinaigrette ingredients together in a small bowl and set aside.

In the large mixing bowl, combine the cooked quinoa, spinach, pear, chickpeas, chopped parsley, and walnuts. Stir in the vinaigrette and season with salt and pepper to taste.

Monday, October 10, 2011

Blue Cheese Stuffed Pork Chops with Pears

The below is a great fall pork chop recipe that I came across in this month's Cooking Light magazine. I loved how the blue cheese and pears added to the flavor of the pork. Unfortunately I didn't cook the pork as well as I could have. As I have mentioned in the past, cooking pork can be difficult (at least in my opinion). I like cooking the pork chops on the stove first and then finishing them in the oven but I could have kept mine in the oven a few extra minutes. Our pork was a little on the pink side and had to be reheated. Reheating aside, I really liked the dish and it was incredibly quick to make.


Blue Cheese Stuffed Pork Chops with Pears
** adapted from Cooking Light

Serves 2
Prep/Cook Time: 20 minutes

2 (4 ounce) boneless butterflied pork chops
1/4 c. crumbled blue cheese
salt and pepper
1 tsp olive oil
1 tsp butter
1 pear, cored and thinly sliced

Preheat oven to 375 degrees. Stuff 2 tablespoons crumbled blue cheese into each pork chop pocket. Sprinkle a little salt and pepper evenly over both sides of pork. Heat a large nonstick skillet over medium-high heat. Add olive oil to pan; swirl to coat. Add pork to pan and sauté for 4 minutes on each side. Put the skillet in the oven and bake for about 5-6 minutes. Remove pork from pan, and let stand for 5 minutes.

Melt butter in pan; swirl to coat. Add pear; sprinkle with 1/4 teaspoon salt and 1/4 teaspoon pepper. Sauté 4 minutes or until lightly browned, stirring occasionally. Serve with pork.

Tuesday, September 20, 2011

Curried Butternut Squash and Wild Rice Soup

Let me first say that this soup turned out awesome, I absolutely loved it. The combination of the squash, sweet potato and apple plus the addition of the apple chicken sausage is perfect for fall. That being said I have to be honest and say this soup was pretty time consuming. If you could bypass cutting up the butternut squash, making this soup would be much easier. Now Brady did let me in on a secret (after I cut up 4 pounds of butternut squash), apparently you can microwave the butternut squash for a few minutes before cutting and that helps soften up the squash. Definitely going to try that next time!

While the soup took a little work to make it was definitely worth it. It would be the perfect recipe to make on a Sunday when you have a little more time. It would also be much easier with a second set of hands in the kitchen. Hopefully I haven't scared anyone from trying this recipe because it really is worth the work and it makes a ton so you can easily freeze some of the soup which will make all of your labor even more worth it!

Taken from the These Peas are Hallow website. My photographer (Brady) wasn't here and I have given up on trying to photograph soup. It always looks terrible!

Curried Butternut Squash and Wild Rice Soup
** from These Peas are Hallow

Serves: 8
Prep/Cook Time: 1 hour and 30 minutes
1 - 4 lb butternut squash, peeled, seeded, and cubed into 1 inch pieces
2 large sweet potatoes, peeled and cubed into 1/2 inch pieces
6 shallots, peeled and quartered
2 small granny smith apples, or 1 large, peeled, cored, and quartered
10 cups chicken stock
1 1/2 cups wild rice, cooked according to package directions
1-2 tablespoons curry powder
4 chicken-apple sausages, diced
olive oil
salt and pepper

Preheat oven to 400.

Toss squash, apples, shallots, and sweet potatoes with a tablespoon olive oil, season with salt and pepper, and spread out on two baking sheets that have been sprayed with cooking spray. Roast for about an hour, tossing a few times, until soft and cooked through, and beginning to turn golden brown.

Transfer about half the vegetables to a food processor with 2-4 cups of chicken stock (enough to cover veggies), and puree until smooth. Transfer to stock pot, and repeat with remaining vegetables.  Stir in the cooked wild rice, and add the remaining chicken stock to desired thickness. Season with 1-2 tablespoons of curry powder, depending on how spicy you like it, and salt and pepper to taste. Bring the soup up to a very gentle simmer.

Meanwhile, heat a small amount of olive oil in a medium saute pan, and cook the sausage over medium high heat until cooked though and crispy brown. You can either stir the sausage in or use it as a garnish.

Monday, September 19, 2011

Quinoa Salad with Edamame and Lemon-Dill Dressing

I made the below salad a couple of weeks ago and have been meaning to add it to the blog. I loved how simple it was and it can be served warm or cold. I brought this in my lunch all week and ate it cold and it was great.  You could easily alter the ingredients to suit your taste; I thought some canned tuna would be an easy and cheap substitute for the chicken. This salad will definitely be added to my lunch rotation!


Quinoa Salad with Edamame and Lemon-Dill Dressing
*** adapted from One Perfect Bite

Serves: 6
Prep/Cook Time: 20 minutes

1 c. quinoa
2 c. vegetable or chicken broth
2 c. frozen shelled edamame, thawed
1 c. cooked chopped chicken
1 T. grated lemon zest
2 T. fresh lemon juice
2 T. olive oil
2 T. chopped fresh dill
1/2 tsp salt
1/2 c. drained and diced jarred roasted red peppers
1/4 c. chopped walnuts

Bring broth to a boil in a medium saucepan. Add quinoa and return to a boil. Cover and reduce heat to a simmer. Cook quinoa for 8 minutes. Remove lid and add edamame. Cover and continue to cook about 8 minutes. Drain any remaining water if necessary.

Whisk lemon juice, oil, dill and salt in a large boil. Add peppers and quinoa. Toss to combine. Stir in chopped chicken and walnuts.

Monday, September 12, 2011

Pork Chops with Mushrooms and Shallots

I made the below pork chop recipe for Brady over Labor Day weekend and it was a huge hit. Brady's a big fan of pork chops but I never seem to think of making them. When I've made pork chops in the past, I've been afraid that I was going to overcook the pork but the below cooking method helps keep them from drying out. Plus, you can set the cooked pork chops aside, tented with a little foil, while you prepare the sauce and that allows the juices to settle in the meat, making them extra flavorful. I served the pork chops with roasted vegetables which made for a perfect simple and healthy dinner.


Pork Chops with Mushrooms and Shallots
** adapted from Skinny Taste.com

Serves 2
Prep/Cook Time: 25 minutes

1 tsp butter
2 pork line chops (with bone), 1 inch thick, trim all fat
1/2 tsp salt
fresh ground pepper
3 shallots, thinly sliced
1 c. fat free chicken broth
10 oz. sliced baby bella mushrooms
1 T. dijon mustard
2 T. chopped parsley

Preheat oven to 375.

In a large skillet, heat the butter over medium heat. Season pork with salt and pepper and add the pork to the skillet. Saute for 5 minutes, turn and cook for an additional 5 minutes. Put the skillet in the oven and cook the pork for an addition 5 minutes or until done. Remove cooked pork chops from the skillet; set aside and keep warm.

Add shallots to the skillet and cook until soft, about 3 minutes. Add the stock to deglaze the pan and stir in the mustard, 1 T. parsley, and mushrooms. Season the sauce with salt and pepper and cook about 3 minutes. Put the chops on a platter and pour the mushroom sauce over the meat, top with remaining parsley.

Saturday, September 3, 2011

BLT Pasta

I just realized that I haven't posted any new recipes since the 18th, yikes! It's been a busy (and fun) two weeks with the start of school and a wedding last weekend in Minneapolis. I have a few recipes that I will be posting this weekend that we have made over the last two weeks and hopefully from here on out I will be better about posting more frequently. No guarantees though!

This week we made two great dishes, a BLT pasta and a pizza that I will share the recipe for later. The BLT pasta was Brady's idea, it's a favorite dish of his at a restaurant in Eau Claire, Wisconsin where he went to college. I was expecting a heavy pasta dish but the recipe that we used is light and perfect for the end of summer. I loved the garlic lemon sauce and the addition of the basil and arugula not only adds great flavor but makes the dish bright and aesthetically pleasing!


BLT Pasta
recipe from Heather Cristo Cooks

Serves 4
Prep/Cook Time: 25 minutes

1 lb whole wheat pasta (we used Fusilli)
5-6 slices bacon
1 large bunch arugula
1 handful fresh basil
2 cups cherry tomatoes
2 cloves garlic, minced
2 lemons, juiced
¼ cup olive oil (I think you could use less and just add a little pasta water at the end)
Kosher salt and Cracked black pepper
*** canned crab meat (optional) 

Bring a large pot of water to a boil.

Meanwhile, cook the bacon till crispy and then set aside to drain on a paper towel.

Cook the pasta according to directions.

In a small bowl, combine garlic, lemon juice, and olive oil. Add the vinaigrette to a skillet and bring to a simmer. Add the cooked pasta to the skillet and toss to coat. Add the crumbled bacon, arugula, basil, and cherry tomatoes to the pasta and toss. Season with salt and pepper.

*** The original recipe suggests topping the pasta with a little crab meat. We tried this, it was good but I don't think it's necessary.

Thursday, August 18, 2011

Chicken with Mustard Mascarpone Marsala Sauce

I have exciting news to share, I got a teaching job!!! I am going to be teaching a 1st/2nd grade split class at a school in Evanston. I'm extremely excited and so thankful that I was able to find such a great job. I found out I got the position Tuesday afternoon, started yesterday and the first day of school is next Wednesday- needless to say, I have been a little busy.

I've been wanting to post the below recipe for a few days now and just haven't gotten to it. Brady made Giada's recipe for Chicken with Mustard Mascarpone Marsala Sauce for me and it was amazing. I loved the creaminess of the sauce and the addition of the mushrooms. It's not the prettiest dish (hence why I am using Giada's photo instead of mine) but it tastes great!

 
Photo Courtesy of Food Network
Chicken with Mustard Mascarpone Marsala Sauce
** recipe courtesy of Giada De Laurentiis

Serves 4
Prep/Cook Time: 45 minutes

1 1/2 pounds boneless skinless chicken breasts, each breast cut crosswise into 3 pieces
Salt and freshly ground black pepper
2 T. olive oil
2 T. butter, divided
3/4 c. chopped onion
1 pound cremini mushrooms, sliced
2 T. minced garlic
1 c. dry Marsala wine
1 c. mascarpone cheese or light cream cheese
2 T. Dijon mustard
2 T. chopped fresh Italian parsley leaves, plus whole sprigs, for garnish
12 ounces dried fettuccine

Sprinkle the chicken with salt and pepper. Heat the oil in a heavy large skillet over high heat. Add the chicken and cook just until brown, about 4 minutes per side. Transfer the chicken to a plate and cool slightly.

While the chicken cools, melt 1 tablespoon of butter in the same skillet over medium-high heat, then add the onion and saute until tender, about 2 minutes. Add the mushrooms and garlic and saute until the mushrooms are tender and the juices evaporate, about 12 minutes. Add the Marsala wine and simmer until it is reduced by half, about 4 minutes. Stir in the mascarpone and mustard. Cut the chicken breasts crosswise into 1/3-inch-thick slices. Return the chicken to the skillet. Simmer, uncovered, over medium-low heat until the chicken is just cooked through and the sauce thickens slightly, about 2 minutes. Stir in the chopped parsley. Season the sauce, to taste, with salt and pepper.

Meanwhile, bring a large pot of salted water to a boil. Add the fettuccine and cook until al dente, stirring occasionally, about 8 minutes. Drain. Toss the fettuccine with 1 tablespoon of butter and season, to taste, with salt and pepper. Swirl the fettuccine onto serving plates. Spoon the chicken mixture over top. Garnish with parsley sprigs and serve.

Thursday, August 11, 2011

Happy Blog Anniversary!

This past Tuesday marked the one year anniversary of A Kitchen on Elm Street. I had planned to make a celebration dinner and bake a fun cake but unfortunately life got in the way. It turned out to be a busy week of job interviews, working, and unfortunately pretty unexciting meals. Since I can't write about some exciting dinner we made, I decided to share our top 5 recipes from the past year. My mom has been asking me to do this for a while now, so here they are in no particular order!

Brady's Top 5 Recipes
Bruschetta with Honey, Ricotta, and Pistachios

My Top 5 Recipes
Sausage and Fig Pizza
African Peanut Soup
Soy Glazed Short Ribs
Chipotle Honey Chicken with Sweet Potatoes and Squash
Chicken Pot Pie
** and since it's my blog I am adding in a 6th- Pumpkin Spice Cupcakes!

Let me just say, making this list was nearly impossible. I have so many favorites plus so many of these recipes make me smile as I think of the story behind them. It's definitely been fun documenting our exciting travels, meals at great Chicago restaurants and all of the time spent cooking in my kitchen on Elm Street!**

** And Brady's kitchen on Clifton, then Sheridan, and now Pine Grove :)

Saturday, August 6, 2011

Mexican Pizza

Pizza is one of those foods that always hits the spot. I love making my own pizza because it's easy, cheap and always ends up being much healthier then delivery. Now don't get me wrong, there are definitely times were delivered pizza is in fact the easiest route to go. But, on a night like last night, when I was just staying in and had some pizza dough on hand and random ingredients, it was the perfect night to come up with a new pizza combination.

I'm not sure if I've had Mexican Pizza before. I know I've seen it on countless pizza menus and now I know why. It's really good!! I loved the black bean sauce. I honestly could have just dipped a few chips in it and would have been happy. I used spicy chicken sausage because I had it on hand but using ground turkey or beef, or even forgetting the meat all together, would work. I thought this was another winning pizza combo and a perfect example of thinking outside the box (pizza box that is!)


Mexican Pizza

Serves 4
Prep/Cook Time: 30 minutes

favorite pizza dough
1 can black beans, drained and rinsed
1 tsp cumin
1 tsp cayenne powder
1 tsp chili powder
1 lime
1 red pepper, diced or cut into strips
1/2 red onion, diced
1 jalapeno, seeds removed and diced
2 Spicy Chicken Sausage links, diced
bunch of cilantro
Monterrey Jack cheese

Preheat oven according to instructions on the dough. Spray a pizza pan with cooking spray and dust with a little flour.

Using a food processor or immersion blender, blend the black beans until smooth. Stir in the cumin, cayenne pepper, chili powder and the juice of half a lime. Season with salt and pepper and add more cayenne if you would like the black bean sauce more spicy.

Spread the pizza dough on the prepared pan. Cover the dough with the black bean sauce, leaving about a 1 inch crust free of sauce. Top with the red pepper, red onion, jalapeno, chicken sausage, and enough cheese to cover the pizza. Top with some cilantro and bake according to the dough directions. Serve with a slice of lime.

Thursday, August 4, 2011

Toasted - Coconut Rice Pilaf

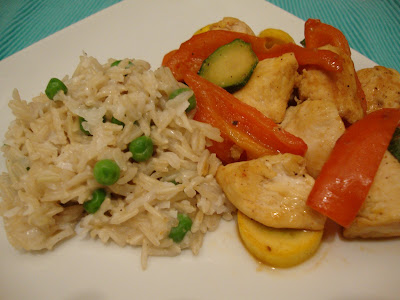
Unfortunately I haven't spent much time in the kitchen this week. The last time I cooked (making eggs and heating up my rotisserie chicken from the store doesn't count) was last weekend. I felt like Thai food and it was the perfect opportunity to try out the below rice pilaf recipe. I LOVED it! It was super easy and tasted like something you'd order from a takeout restaurant. Plus it was so much healthier than anything that could have been delivered. I served the rice with chicken, zucchini, red pepper, and summer squash that had been sauteed in a Thai peanut sauce (I recommend House of Tsang, it's great and low in fat and calories).


Toasted-Coconut Rice Pilaf

Serves 4
Prep/Cook Time: 25 minutes

3 T. coconut
1 T. olive oil
1 c. long grain brown rice
1 c. broth
1 c. light coconut milk
2 or 3 slices lime
1/2 c. frozen peas

In a medium saucepan, toast the coconut over medium heat for about 2 minutes. Transfer to a bowl and set aside.

In the same saucepan, heat oil over medium-high heat. Add rice and sauce for about 3 minutes. Add broth and coconut milk and bring a boil. Add a little salt and pepper and the lime slices. Stir, cover tightly and reduce heat to low and simmer about 15-20 minutes or until fluffy. Make sure to stir occasionally.

Add peas and coconut and stir to combine. Cook 1 minute or until peas are just cooked through.

Saturday, July 30, 2011

Chicken Caprese Pasta

Last weekend I made bruschetta and ended up with leftover tomatoes, mozzarella and basil that I didn't want to go to waste. Mixing them in with some pasta seemed like an obvious solution for a quick weeknight meal. Not incredibly creative, but super simple, the pasta tasted great and it was the perfect way to use up the leftover bruschetta fixings!

Chicken Caprese Pasta

Serves 4
Prep/Cook Time: 25 minutes

16 oz. whole wheat pasta, any shape
2 chicken breasts, cut into bite-sized pieces
1/2 jar Vodka Sauce (I recommend Trader Joe's)
1 roma tomato, diced
1/4 c. fresh mozzarella, diced
handful (about 10) basil leaves, cut into ribbons

Bring a large pot of water to a boil. Cook the pasta as directed and drain once the pasta is al dente.

Meanwhile, heat a large skillet over medium high heat. Add a tsp of oil to coat the pan. Cook the chicken until done and then remove from the skillet and set aside.

In a small saucepan, heat the vodka sauce. Once heated through turn down to low until the pasta is cooked. 

In the large pot, combine the pasta, vodka sauce, chicken, diced tomatoes, mozzarella, and fresh basil. Stir to combine over medium heat until the cheese starts to melt and then serve.

Friday, July 29, 2011

Chocolate Coconut Blondies

This past weekend Brady and I spent the afternoon in the suburbs at a barbeque hosted by a former co-worker of Brady's and his wife. It was nice to get out of the city for the day, enjoy some good food, and visit with our friends but I have to say the real highlight was hanging out with their two month old triplets. Yes, I said triplets!! They were absolutely adorable and I couldn't have been more excited to have not just one, but three babies to hold!

I wanted to bring a few things to the barbeque and felt like it was the perfect excuse to bake. I came across the below recipe for Chocolate Coconut Blondies and knew that I had to give them a try. Not only did they look amazing but the Brown Eyed Baker said they tasted like Somoas, my favorite Girl Scout cookie. I thought they turned out great, I loved the combination of chocolate and coconut. Next time, I think I will add also drizzle melted caramel on top to make them taste even more like Somoas.

Picture courtesy of Brown Eyed Baker 
Chocolate Coconut Blondies
** from Brown Eyed Baker

Makes about 16 bars
Prep/Cook Time: 1 hour (includes cooling time)

1 c. all-purpose flour
1/8 tsp salt
4 ounces unsalted butter, melted and cooled to room temperature
1 c. light brown sugar
1 large egg
1½ tsp vanilla extract
1 c. sweetened flaked coconut
1 c. chocolate chips

Topping:
1 cup semisweet chocolate chips
1 teaspoon butter

Preheat the oven to 350 degrees. Grease and flour a 8x8 square baking dish. 

In a small mixing bowl, combine the flour and salt; set aside.

In the bowl of a stand mixer, combine the melted butter and brown sugar and stir until combined. Add the egg and vanilla extract and beat with the mixer until combined. Slowly beat in the flour mixture and then stir in the chocolate chips and coconut.

Spoon the batter into the prepared baking dish. Bake for 25-30 minutes or until set and an inserted toothpick comes out clean. Be careful not to overbake. Let the bars cool.

Once the bars have cooled, combine the chocolate chips and butter in a small saucepan over low heat. Stir continuously until the chocolate is melted. Use a spoon to drizzle on the melted chocolate or spoon the chocolate into a ziplock bag, cut a small corner off, and then pipe the chocolate onto the bars.